The growth of social media platforms over the past decade has revolutionized how people and businesses communicate. One such platform that has recently gained prominence is Koo, a microblogging site that’s becoming a popular communication hub. Integrating this platform with your website can be a powerful way to increase your online reach and user engagement. Today, we will walk you through an automated process of posting on Koo from a website using PHP.
Let’s first take a closer look at the code snippet given above, which is written in PHP and integrates with the WordPress content management system (CMS).
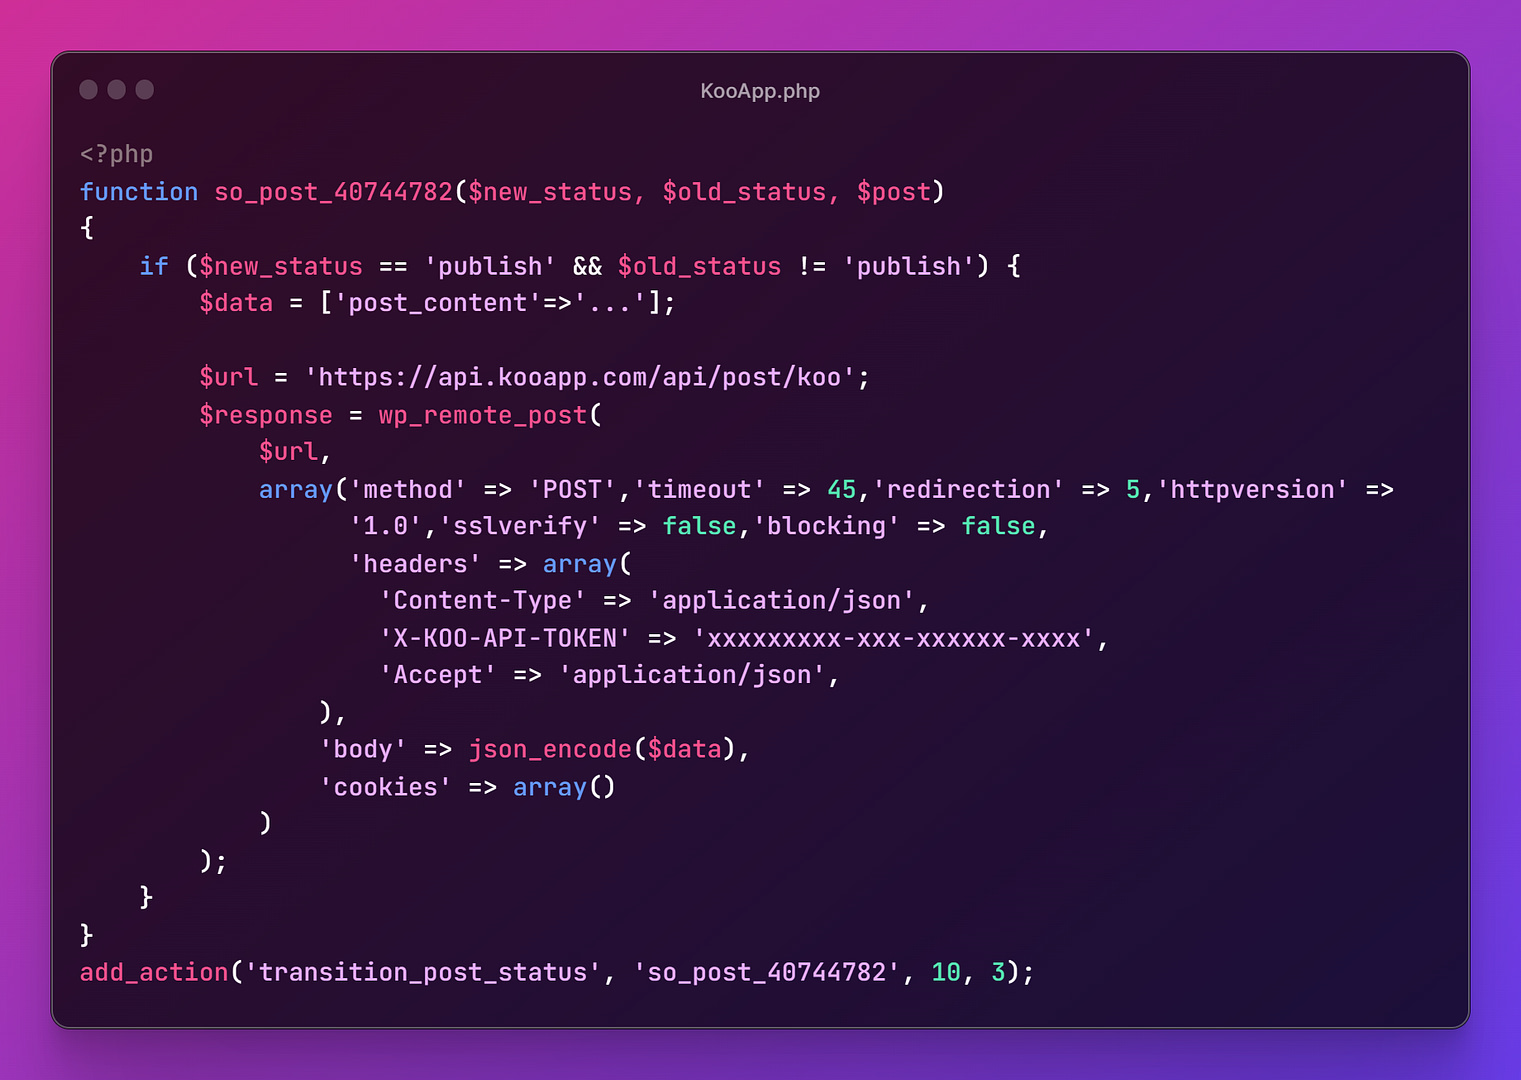
<?php

/**
 * Automatic Posting a Koo
 */
function so_post_40744782($new_status, $old_status, $post)
{
    if ($new_status == 'publish' && $old_status != 'publish') {
        $data = [
            'koo' => substr(
                strip_tags(
                    get_post_field('post_content', $post->ID)
                ),
                0,
                340
            ) . ' ...',
            'language' => 'hi',
            'link' => get_the_permalink($post->ID)
        ];

        $url = 'https://api.kooapp.com/api/post/koo';
        $response = wp_remote_post(
            $url,
            array(
                'method' => 'POST',
                'timeout' => 45,
                'redirection' => 5,
                'httpversion' => '1.0',
                'sslverify' => false,
                'blocking' => false,
                'headers' => array(
                    'Content-Type' => 'application/json',
                    'X-KOO-API-TOKEN' => 'xxxxxxxxx-xxx-xxxxxx-xxxx',
                    'Accept' => 'application/json',
                ),
                'body' => json_encode($data),
                'cookies' => array()
            )
        );
    }
}
add_action('transition_post_status', 'so_post_40744782', 10, 3);
This PHP function,
so_post_40744782, is designed to automatically post content to Koo when the status of a post in WordPress changes from anything to ‘publish’. This means that when a new post gets published on your WordPress website, this function will be triggered and the content will be automatically posted to Koo as well.The function takes in three parameters:
$new_status,$old_status, and$post. It checks if the$new_statusis ‘publish’ and if the$old_statusis anything other than ‘publish’. This means the function will only be triggered when a new post gets published and not in other status transitions.The function then constructs a
$dataarray containing the ‘koo’ (i.e., the content of the post to be sent to Koo), ‘language’, and ‘link’. The ‘koo’ is retrieved from the post’s content and is stripped of any HTML tags. Since Koo has a character limit of 400 characters, the function uses thesubstrPHP function to truncate the post content to 340 characters, adding ellipses at the end.Next, the function makes a POST request to Koo’s API endpoint (
https://api.kooapp.com/api/post/koo) with the constructed$dataarray. The array is JSON-encoded before sending, as the API requires the data to be in JSON format. Thewp_remote_postfunction is used to make the request. The headers contain the Content-Type set as ‘application/json’, and ‘X-KOO-API-TOKEN’, which would be your API token from Koo.Finally, the
add_actionfunction is called to add a hook to the ‘transition_post_status’ WordPress action, which is triggered whenever a post’s status changes. This function connects ourso_post_40744782function to this action, and the latter function will be called with the parameters ‘new_status’, ‘old_status’, and ‘post’.This script presents an excellent opportunity for businesses and bloggers to automate their social media posts. It ensures that their Koo followers are updated whenever new content is posted on the website, increasing traffic and boosting engagement.
Please note that you need to replace
Happy coding!'xxxxxxxxx-xxx-xxxxxx-xxxx'with your actual Koo API token. Also, ensure that your website is SSL-enabled, as sending requests over HTTP can expose sensitive data like your API token.
Add a Comment